ubuntu硬件测试
Contents
cpu内存IO硬盘压力及温度测试
安装stress
stress-ng 更强大,可模拟生产环境的各种情况进行压测。但这个更简单。如果仅是对硬件测试,使用stress即可。
|
|
命令行参数
|
|
测试
测试命令如下,具体操作见上方帮助。
|
|
封装一下 vi /bin/t 内容如下,使用 t 1h 即可测试。
|
|
输出无温度时只显示成功,如下所示,有时温度过高报警信息会打出报警。
|
|
循环压力测试并打印温度
-
压测30分钟,每分钟打印一次温度:
for i in {1..30}; do t 1m; sensors; done -
压测30分钟,打印最后温度:
t 30m; sensors
usb3.0测试
- 挂载优盘到文件夹:
mount /dev/sdc1 u - 测试写入速度可以在优盘里写入一个2G大文件,并打印速度和时间:
time dd if=/dev/zero of=u/test bs=1M count=2000 conv=fdatasync - 测试读取速度要先清除缓存:
echo 3 > /proc/sys/vm/drop_caches然后读取刚写入的大文件:time dd if=u/test of=/dev/null bs=1M
声卡测试
apt install sox libsox-fmt-all,播放:play 7.mp3
sudo apt-get install moc,打开播放器:mocp
网卡测试
打印网卡信息
|
|
从打印信息可见,该网卡为万兆网卡
ping测试延时、抖动、丢包率
|
|
丢包率0%,抖动是-0.13ms到+0.261ms,延时是 0.114ms(毫秒)
使用iperf3进行网速测试
-
iperf3是一个网络速度测试工具,支持IPv4与IPv6,支持TCP、UDP、SCTP传输协议,可在Windows、Mac OS X、Linux、FreeBSD等各种平台使用,是一个简单又实用的小工具。安装 :
apt install iperf3 -
服务端打开监听
1 2 3 4root@pi-pc:/home/pi/src/embedded/uboot/uboot-alientec# iperf3 -s ----------------------------------------------------------- Server listening on 5201 ----------------------------------------------------------- -
客户端进行连接
1 2 3 4 5 6 7 8 9 10 11 12 13 14 15 16 17 18 19 20root@pi:/home/pi# iperf3 -c 10.102.75.3 Connecting to host 10.102.75.3, port 5201 [ 4] local 10.102.75.4 port 44798 connected to 10.102.75.3 port 5201 [ ID] Interval Transfer Bandwidth Retr Cwnd [ 4] 0.00-1.00 sec 1.10 GBytes 9.42 Gbits/sec 8 554 KBytes [ 4] 1.00-2.00 sec 1.10 GBytes 9.41 Gbits/sec 2 615 KBytes [ 4] 2.00-3.00 sec 1.10 GBytes 9.41 Gbits/sec 0 615 KBytes [ 4] 3.00-4.00 sec 1.10 GBytes 9.42 Gbits/sec 0 628 KBytes [ 4] 4.00-5.00 sec 1.10 GBytes 9.41 Gbits/sec 0 656 KBytes [ 4] 5.00-6.00 sec 1.10 GBytes 9.41 Gbits/sec 0 663 KBytes [ 4] 6.00-7.00 sec 1.10 GBytes 9.42 Gbits/sec 0 663 KBytes [ 4] 7.00-8.00 sec 1.09 GBytes 9.41 Gbits/sec 0 687 KBytes [ 4] 8.00-9.00 sec 1.10 GBytes 9.42 Gbits/sec 0 687 KBytes [ 4] 9.00-10.00 sec 1.10 GBytes 9.41 Gbits/sec 0 687 KBytes - - - - - - - - - - - - - - - - - - - - - - - - - [ ID] Interval Transfer Bandwidth Retr [ 4] 0.00-10.00 sec 11.0 GBytes 9.41 Gbits/sec 10 sender [ 4] 0.00-10.00 sec 11.0 GBytes 9.41 Gbits/sec receiver iperf Done.此时服务端也打印了信息:
1 2 3 4 5 6 7 8 9 10 11 12 13 14 15 16 17 18 19 20 21Accepted connection from 10.102.75.3, port 41128 [ 5] local 10.102.75.4 port 5201 connected to 10.102.75.3 port 41130 [ ID] Interval Transfer Bandwidth [ 5] 0.00-1.00 sec 1.05 GBytes 9.04 Gbits/sec [ 5] 1.00-2.00 sec 1.10 GBytes 9.41 Gbits/sec [ 5] 2.00-3.00 sec 1.10 GBytes 9.41 Gbits/sec [ 5] 3.00-4.00 sec 1.10 GBytes 9.41 Gbits/sec [ 5] 4.00-5.00 sec 1.10 GBytes 9.41 Gbits/sec [ 5] 5.00-6.00 sec 1.10 GBytes 9.41 Gbits/sec [ 5] 6.00-7.00 sec 1.10 GBytes 9.41 Gbits/sec [ 5] 7.00-8.00 sec 1.10 GBytes 9.41 Gbits/sec [ 5] 8.00-9.00 sec 1.10 GBytes 9.41 Gbits/sec [ 5] 9.00-10.00 sec 1.10 GBytes 9.41 Gbits/sec [ 5] 10.00-10.04 sec 44.1 MBytes 9.41 Gbits/sec - - - - - - - - - - - - - - - - - - - - - - - - - [ ID] Interval Transfer Bandwidth [ 5] 0.00-10.04 sec 0.00 Bytes 0.00 bits/sec sender [ 5] 0.00-10.04 sec 11.0 GBytes 9.38 Gbits/sec receiver ----------------------------------------------------------- Server listening on 5201 -----------------------------------------------------------从以上信息可见,网速约为万兆。
无线网卡测试(wifi6)
只需使用ifconfig,在其接口中找到wl开头的网卡名即可。如还有其它无线网卡,则对应的数量应与实际一致。
wifi6网卡与其它无线网卡仅仅是支持的协议标准不一样(802.11 a/b/g/n/ac/ax,wifi6支持ax),并无其它区别。
串口测试
-
列出所有可用串口名
方法一:
dmesg | grep ttyS,如果有USB转串口则:dmesg | grep ttyUSB方法二:
cat /proc/tty/driver/serial -
将串口的2脚和3脚短接(长排在上,从左至右)
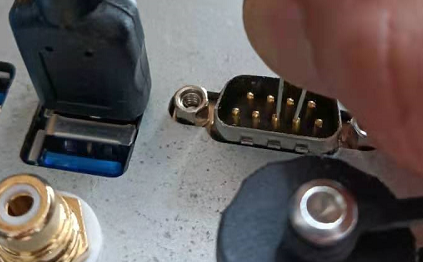
- 使用
minicom -D <串口名>,逐个测试每个可用的串口,任一进入后输入有回显,则表示此短接的串口可用。同时也找到了此串口在系统中“串口名”。
5G测试
搭建如下图环境:
- 笔记本,将网口修改IP为192.168.3.x网段的IP。
- Edge,笔记本连接网口2,通过ssh能登录。
- (非必需)安装TeamViewer或向日葵,笔记本通过手机热点或wifi或有线可上网,方便厂商远程调试。
测试方法:
- 准备sim卡。先使用普通SIM卡在办公室测试,再使用物联网专用SIM卡(并获知其IP)到客户现场测试。
- Sim卡插入edge中,开机会自动拨号.
- 由于edge没有其它上网通道,普通SIM卡可以通过
ping baidu.com来测试是否拨号成功。 - 物联网专用SIM卡可通过PING内网的服务器测试,如
ping 45.117.20.87。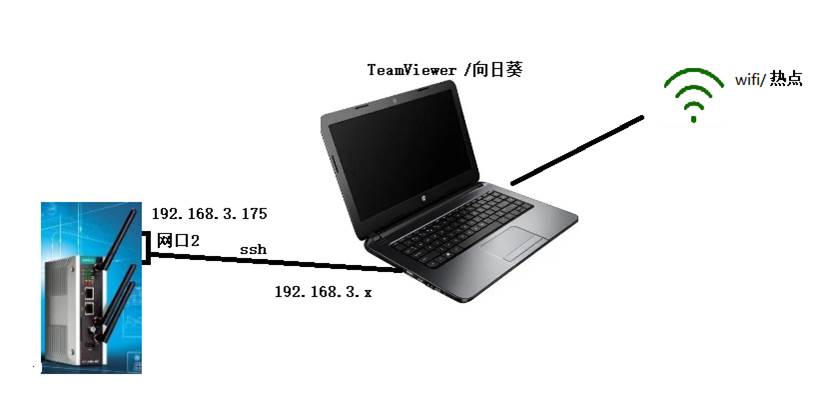
nvidia显卡测试
使用nvidia-smi查看当前显卡工作状态,如下有:GeForce RTX 2060,风扇转速,温度,性能,持续模式,功耗等。下面的表显示进程的显存占用,x-server运行时才有进程数据。
|
|
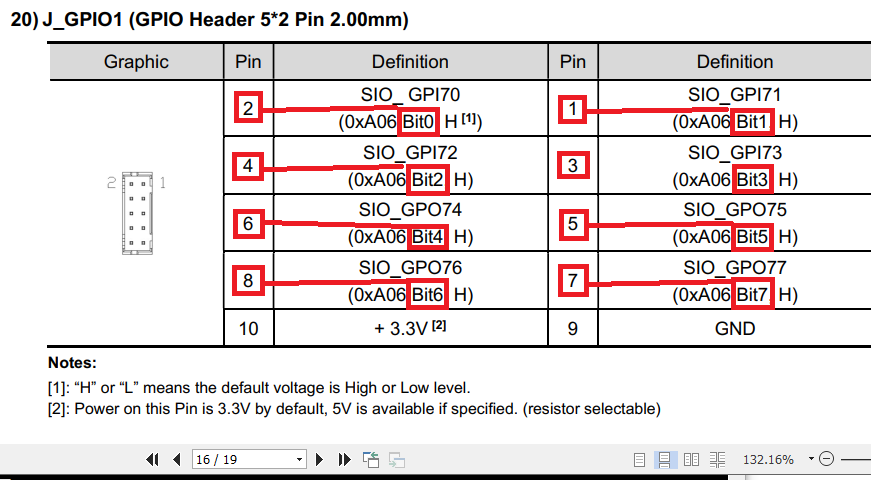
GPIO测试
主板厂家GPIO定义如下图,有4个输入(1,2,3,4),4个输出(5,6,7,8),GND(9)和VCC(10),共10个引脚。
厂家提供源码,可读取输入和控制输出。对于输入口,默认为高电平,将GND与IO口短接时读取到低电平,断开读到高电平。对于输出口,默认输出高电平,因此将 LED的短引脚接GND,长引脚接IO,默认会亮,使用程序使之变为低电平则LED灭,再变为高电平则LED亮。
编译后的程序在:/usr/src/Linux_GPIO_RW/gpio_rw,使用方法:
|
|
从上图可以看出,8个IO映射到内存的同一个字节,但其”bit位“与IO口不是顺序对应的,例如:要查询2的输入值,应查询bit0的值,因此每次测试都需要按图找对应的BIT位,比较麻烦。
因此,我封装了一个脚本test,放入程序相同目录:/usr/src/Linux_GPIO_RW/test,使用方法:
|
|
Author lyj
LastMod 2022-12-05